™
In this tutorial, we go through the basics of what RDF is, and we show how you can use the Eclipse RDF4J framework to create, process, store, and query RDF data.
We assume that you know a little about programming in Java, but no prior knowledge on RDF is assumed.
The Resource Description Framework (RDF) is a standard (or more accurately, a “recommendation”) formulated by the World Wide Web Consortium (W3C). The purpose of RDF is to provide a framework for expressing information about resources in a machine-processable, interoperable fashion.
A resource can be anything that we can stick an identifier on: a web page, an image, but also more abstract/real-world things like you, me, the concept of “world peace”, the number 42, and that library book you never returned.
RDF is intended for modeling information that needs to be processed by applications, rather than just being shown to people.
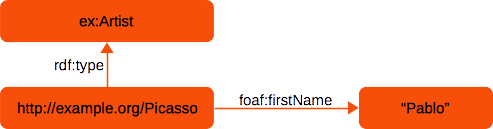
In this tutorial, we will be modeling information about artists . Let’s start with a simple fact: “Picasso’s first name is Pablo”. In RDF, this could be expressed as follows:

So what exactly are we looking at here? Well, we have a resource “Picasso”, denoted by an IRI (Internationalized Resource Identifier): http://example.org/Picasso. In RDF, resources have properties. Here we are using the foaf:firstName property to denote the relation between the resource “Picasso” and the value “Pablo”. foaf:firstName is also an IRI, though to make things easier to read we use an abbreviated syntax, called prefixed names (more about this later). Finally, the property value, “Pablo”, is a literal value: it is not represented using a resource identifier, but simply as a string of characters.
NOTE: the foaf:firstName property is part of the FOAF (Friend-of-a-Friend) vocabulary. This is an example of reusing an existing vocabuary to describe our own data. After all, if someone else already defined a property for describing people’s first names, why not use it? More about this later.
As you may have noticed, we have depicted our fact about Picasso as a simple graph: two nodes, connected by an edge. It is very helpful to think about RDF models as graphs, and a lot of the tools we will be using to create and query RDF data make a lot more sense if you do.
In RDF, each fact is called a statement. Each statement consists of three parts (for this reason, it is also often called a triple):
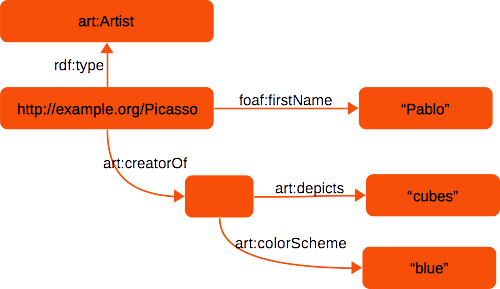
Let’s expand our example slightly: we don’t just have a single statement about Picasso, we know another fact as well: “Picasso is an artist”. We can extend our RDF model as follows:
Notice how the second statement was added to our graph depiction by simply adding a second edge to an already existing node , labeled with the rdf:type property, and the value ex:Artist. As you continue to add new facts to your data model, nodes and edges continue to be added to the graph.
IRIs are at the core of what makes RDF powerful. They provide a mechanism that allows global identification of any resource: no matter who authors a dataset or where that data is physically stored, if that data shares an identical IRI with another dataset you know that both datasets are talking about the same thing.
In many RDF data sets, you will see IRIs that start with ‘http://…’. This does not necessarily mean that you can open this link in your browser and get anything meaningful, though. Quite often, IRIs are merely used as unique identifiers, and not as actual addresses. Some RDF sources do make sure that their IRIs can be looked up on the Web, and that you actually get back data (in RDF) that describes the resource identified by the IRI. This is known as a Linked Data architecture. The ins and outs of Linked Data are beyond the scope of this tutorial, but it’s worth exploring once you understand the basics of RDF.
You will often see IRIs in abbreviated form whenever you encounter examples of RDF data: <prefix>:<name> This abbreviated form, known as “prefixed names”, has no impact on the meaning of the data, but it makes it easier for people to read the data.
Prefixed names work by defining a prefix that is a replacement for a namespace. A namespace is the first part of an IRI that is shared by several resources. For example, the IRIs http://example.org/Picasso, http://example.org/Rodin, and http://example.org/Rembrandt all share the the namespace http://example.org/. By defining a new prefix ex as the abbreviation for this namespace, we can use the string ex:Picasso instead of its full IRI.
In the running example for this tutorial, we use a namespace prefix http://example.org/ that we indiscriminately use for various resource and property IRIs we want to use. In a real world scenario, that is not very practical: we don’t own the domain ‘example.org’, for one thing, and moreover it is not very descriptive of what our resources actually are about.
So, how do you pick good IRIs for your resources and properties? There’s a lot to be said about this topic, some of it beyond the scope of this tutorial. You should at least keep the following in mind:
There are several major benefits to reusing existing vocabulary:
Of course we can’t list every possible reusable RDF vocabulary here, but there are several very generic RDF vocabularies that get reused very often:
rdfs:label, which is used to give a resource a human-readable name, as a string value.BlueCar must have a property Color with value “Blue”. Learning about OWL goes beyond the scope of this tutorial.skos:broader, skos:narrower (to indicate that one term is a broader/narrower term than some other term), skos:prefLabel, skos:altLabel (to give preferred and alternative names for concepts), and more.foaf:Person, and you can use properties such as foaf:firstName, foaf:surname, foaf:mbox to describe all sorts of data about that person.dc:creator (to indicate the creator of a work), dc:subject, dc:title, and more.The flexibility of RDF makes it easy to mix and match models as you need them. You will, in practice, often see RDF data sets that have some “home-grown” IRIs, combined with properties and class names from a variety of different other vocabularies. It’s not uncommon to see 3 or more different vocabularies all reused in the same dataset.
Enough background, let’s get our hands dirty.
Eclipse RDF4J is a Java API for RDF: it allows you to create, parse, write, store, query and reason with RDF data in a highly scalable manner. So let’s see two examples of how we can use RDF4J to create the above RDF model in Java.
Example 01 shows how we can create the RDF model we introduced above using RDF4J:
 1// We want to reuse this namespace when creating several building blocks.
 2String ex = "http://example.org/";
 3
 4// Create IRIs for the resources we want to add.
 5IRI picasso = Values.iri(ex, "Picasso");
 6IRI artist = Values.iri(ex, "Artist");
 7
 8// Create a new, empty Model object.
 9Model model = new TreeModel();
10
11// add our first statement: Picasso is an Artist
12model.add(picasso, RDF.TYPE, artist);
13
14// second statement: Picasso's first name is "Pablo".
15model.add(picasso, FOAF.FIRST_NAME, Values.literal("Pablo"));
Let’s take a closer look at this. Lines 1-6 are necessary preparation: we use Values
factory methods to create resources, which we will later use to add facts to our model.
On line 9, we create a new, empty model. RDF4J comes with several Model
implementations, the ones you will most commonly encounter are DynamicModel
, TreeModel
and LinkedHashModel
. The difference is in how they index data internally - which has a performance impact when working with very large models, and in the ordering with which statements are returned. For our purposes however, it doesn’t really matter which implementation you use.
On lines 12 and 15, we add our two facts that we know about Picasso: that’s he’s an artist, and that his first name is “Pablo”.
In RDF4J, a Model
is simply an in-memory collection of RDF statements. We can add statements to an existing model, remove statements from it, and of course iterate over the model to do things with its contents. As an example, let’s iterate over all statements in our Model using a for-each loop, and print them to the screen:
for (Statement statement: model) {
    System.out.println(statement);
}
Or, even shorter:
model.forEach(System.out::println);
When you run this, the output will look something like this:
(http://example.org/Picasso, http://xmlns.com/foaf/0.1/firstName, "Pablo"^^<http://www.w3.org/2001/XMLSchema#string>) [null]
(http://example.org/Picasso, http://www.w3.org/1999/02/22-rdf-syntax-ns#type, http://example.org/art/Artist) [null]
Not very pretty perhaps, but at least you should be able to recognize the RDF statements that we originally added to our model. Each line is a single statement, with the subject, predicate, and object value in comma-separated form. The [null] behind each statement is a context identifier or named graph identifier, which you can safely ignore for now. The bit ^^<http://www.w3.org/2001/XMLSchema#string> is a datatype that RDF4J assigned to the literal value we added (in this case, the datatype is simply string).
The previous code example shows that you need to do a bit of preparation before actually adding anything to your model: defining common namespaces, creating IRIs, etc. As a convenience, RDF4J provides a ModelBuilder
that simplifies things.
Example 02 shows how we can create the exact same model using a ModelBuilder:
1ModelBuilder builder = new ModelBuilder();
2Model model = builder.setNamespace("ex", "http://example.org/")
3      .subject("ex:Picasso")
4      .add(RDF.TYPE, "ex:Artist")
5      .add(FOAF.FIRST_NAME, "Pablo")
6      .build();
The above bit of code creates the exact same model that we saw in the previous example, but with far less prep code. ModelBuilder accepts IRIs and prefixed names supplied as simple Java strings. On line 3 we define a namespace prefix we want to use, and then on lines 4-6 we use simple prefixed name strings, which the ModelBuilder internally maps to full IRIs.
We have sofar seen literal values that were just simple strings. However, in RDF, every literal has an associated datatype that determines what kind of value the literal is: a string, an integer number, a date, and so on. In addition, a String literal can optionally have a language tag that indicates the language the string is in.
Datatypes are associated with a literal by means of a datatype IRI, usually for a datatype defined in XML Schema. Examples are http://www.w3.org/2001/XMLSchema#string, http://www.w3.org/2001/XMLSchema#integer, http://www.w3.org/2001/XMLSchema#dateTime (commonly abbreviated as xsd:string, xsd:integer, xsd:dateTime, respectively). A longer (though not exhaustive) list of supported data types is available in the RDF 1.1 Concepts specification.
Languages are associated with a string literal by means of a “language tag”, as identified by BCP 47. Examples of language tags are “en” (English), “fr” (French), “en-US” (US English), etc.
We will demonstrate the use of language tags and data types by adding some additional data to our model. Specifically, we will add some information about a painting created by van Gogh, namely “The Potato Eaters”.
Example 03
shows how we can add the creation date (as an xsd:date) and the number of people depicted in the painting (as an xsd:integer):
 1ModelBuilder builder = new ModelBuilder();
 2Model model = builder
 3    .setNamespace("ex", "http://example.org/")
 4    .subject("ex:PotatoEaters")
 5    // this painting was created on April 1, 1885
 6    .add("ex:creationDate", LocalDate.parse("1885-04-01"))
 7    // instead of a java.time value, you can directly create a date-typed literal as well
 8    // .add("ex:creationDate", literal("1885-04-01", XSD.DATE))
 9
10    // the painting shows 5 people
11    .add("ex:peopleDepicted", 5)
12    .build();
13
14// To see what's in our model, let's just print stuff to the screen
15for (Statement st : model) {
16  // we want to see the object values of each property
17  IRI property = st.getPredicate();
18  Value value = st.getObject();
19  if (value.isLiteral()) {
20    Literal literal = (Literal) value;
21    System.out.println("datatype: " + literal.getDatatype());
22
23    // get the value of the literal directly as a Java primitive.
24    if (property.getLocalName().equals("peopleDepicted")) {
25      int peopleDepicted = literal.intValue();
26      System.out.println(peopleDepicted + " people are depicted in this painting");
27    } else if (property.getLocalName().equals("creationDate")) {
28      LocalDate date = LocalDate.from(literal.temporalAccessorValue());
29      System.out.println("The painting was created on " + date);
30    }
31
32    // you can also just get the lexical value (a string) without worrying about the datatype
33    System.out.println("Lexical value: '" + literal.getLabel() + "'");
34  }
35}
Example 04 shows how we can add the title of the painting in both Dutch and English, and how we can retrieve this information back from the model:
 1ModelBuilder builder = new ModelBuilder();
 2Model model = builder
 3    .setNamespace("ex", "http://example.org/")
 4    .subject("ex:PotatoEaters")
 5    // In English, this painting is called "The Potato Eaters"
 6    .add(DC.TITLE, Values.literal("The Potato Eaters", "en"))
 7    // In Dutch, it's called "De Aardappeleters"
 8    .add(DC.TITLE, Values.literal("De Aardappeleters", "nl"))
 9    .build();
10
11// To see what's in our model, let's just print it to the screen
12for (Statement st : model) {
13  // we want to see the object values of each statement
14  Value value = st.getObject();
15  if (value.isLiteral()) {
16    Literal title = (Literal) value;
17    System.out.println("language: " + title.getLanguage().orElse("unknown"));
18    System.out.println(" title: " + title.getLabel());
19  }
20}
Sometimes, we want to model some facts without explicitly giving all resources involved in that fact an identifier. For example, consider the following sentence: “Picasso has created a painting depicting cubes, and using a blue color scheme”. There are several facts in this sentence:
All of the above may be true, but it doesn’t involve identifying a specific painting. All we know is that there is some (unknown) painting for which all of this is true. We can express this in RDF using a blank node.
When looking at a graph depiction of the RDF, it becomes obvious why it is called a blank node:
Other possible uses for blank nodes are for modeling a collection of facts that are strongly tied together. For example, “Picasso’s home address is ‘31 Art Gallery, Madrid, Spain’” could be modeled as follows:

The address itself has no identifier, but is a sort of “compound object” consisting of multiple attributes.
Example 05 shows how we can add the address of Picasso to our Model:
 1// Create a bnode for the address
 2BNode address = Values.bnode();
 3
 4// First we do the same thing we did in example 02: create a new ModelBuilder, and add
 5// two statements about Picasso.
 6ModelBuilder builder = new ModelBuilder();
 7builder
 8    .setNamespace("ex", "http://example.org/")
 9    .subject("ex:Picasso")
10    .add(RDF.TYPE, "ex:Artist")
11    .add(FOAF.FIRST_NAME, "Pablo")
12    // this is where it becomes new: we add the address by linking the blank node
13    // to picasso via the `ex:homeAddress` property, and then adding facts _about_ the address
14    .add("ex:homeAddress", address) // link the blank node
15    .subject(address) // switch the subject
16    .add("ex:street", "31 Art Gallery")
17    .add("ex:city", "Madrid")
18    .add("ex:country", "Spain");
19
20Model model = builder.build();
21
22// To see what's in our model, let's just print it to the screen
23for (Statement st : model) {
24  System.out.println(st);
25}
In the previous sections we saw how to print the contents of an RDF4J Model to the screen, However, this is of limited use: the format is not easy to read, and certainly not by any other tools that you may wish to share the information with.
Fortunately, RDF4J provides tools for reading and writing RDF models in several syntax formats, all of which are standardized. These syntax formats can be used to share data between applications. The most commonly used formats are RDF/XML, Turtle, and N-Triples.
Example 06
shows how we can write our Model as RDF/XML, using the RDF4J Rio
parser/writer tools:
Rio.write(model, System.out, RDFFormat.RDFXML);
The output will be similar to this:
<?xml version="1.0" encoding="UTF-8"?>
<rdf:RDF
  xmlns:ex="http://example.org/"
  xmlns:xsd="http://www.w3.org/2001/XMLSchema#"
  xmlns:rdf="http://www.w3.org/1999/02/22-rdf-syntax-ns#">

<rdf:Description rdf:about="http://example.org/Picasso">
  <rdf:type rdf:resource="http://example.org/Artist"/>
  <firstName xmlns="http://xmlns.com/foaf/0.1/" rdf:datatype="http://www.w3.org/2001/XMLSchema#string">Pablo</firstName>
  <ex:homeAddress rdf:nodeID="node1b4koa8edx1"/>
</rdf:Description>

<rdf:Description rdf:nodeID="node1b4koa8edx1">
  <ex:street rdf:datatype="http://www.w3.org/2001/XMLSchema#string">31 Art Gallery</ex:street>
  <ex:city rdf:datatype="http://www.w3.org/2001/XMLSchema#string">Madrid</ex:city>
  <ex:country rdf:datatype="http://www.w3.org/2001/XMLSchema#string">Spain</ex:country>
</rdf:Description>

</rdf:RDF>
The Rio.write method takes a java.io.OutputStream or a java.io.Writer as an argument, so if we wish to write to file instead of to the screen, we can simply use a FileOutputStream or a FileWriter and point it at the desired file location.
Example 07
shows how we can write our Model in the Turtle
syntax format:
Rio.write(model, System.out, RDFFormat.TURTLE);
To produce other syntax formats, simply vary the supplied RDFFormat. Try out a few different formats yourself, to get a feel for what they look like.
The output in Turtle format looks like this:
1@prefix ex: <http://example.org/> .
2
3ex:Picasso a ex:Artist ;
4        <http://xmlns.com/foaf/0.1/firstName> "Pablo" ;
5        ex:homeAddress _:node1b4koq381x1 .
6
7_:node1b4koq381x1 ex:street "31 Art Gallery" ;
8        ex:city "Madrid" ;
9        ex:country "Spain" .
If you compare this with the output of writing to RDF/XML, you will notice that the Turtle syntax format is a lot more compact, and also easier to read for a human. Let’s quickly go through it:
On the first line, a namespaces prefix is defined. It is one we recognize: the ex namespace that we added to our RDF model earlier. Turtle syntax supports using prefixed names to make the format more compact, and easier to read.
Lines 3-5 show three RDF statements, all about ex:Picasso.
The first statement, on line 3, says that Picasso is of type Artist. In Turtle, a is a shortcut for the rdf:type property. Notice that the line ends with a ;. This indicates that the next line in the file will be about the same subject.
Line 4 says that Picasso’s first name is “Pablo”. Notice that here the full IRI is used for the property - this happens because we didn’t set a namespace prefix for it when we created our model.
Line 5, finally, states that Picasso has a homeAddress, which is some blank node (a blank node identifier in Turtle syntax always starts with _:). Note that this line ends with a ., which indicates that we are done stating facts about the current subject.
Line 7 and further, finally, state facts about the blank node (the home address of Picasso): its street is “31 Art Gallery”, its city is “Madrid”, and its Country is “Spain”.
Very similar to how we can write RDF models to files in various syntaxes, we can also use RDF4J Rio to read files to produce an RDF model.
Example 08
shows how we can read a Turtle file and produce a Model object out of it:
1String filename = "example-data-artists.ttl";
2
3// read the file 'example-data-artists.ttl' as an InputStream.
4InputStream input = Example06ReadTurtle.class.getResourceAsStream("/" + filename);
5
6// Rio also accepts a java.io.Reader as input for the parser.
7Model model = Rio.parse(input, "", RDFFormat.TURTLE);
Now that we know how to create, read, and save an RDF Models, it is time to look at how we can access the information in a Model.
We have already seen one simple way of accessing a Model
: we can iterate over its contents using a for-each loop. The reason this works is that Model extends the Java Collection API, more particularly it is a java.util.Set<Statement>.
We have more sophisticated options at our disposal, however.
Example 09
shows how we can use Model.filter
to “zoom in” on a specific subject in our model. We’re also using the opportunity to show how you can print out RDF statements in a slightly prettier way:
 1// We want to find all information about the artist `ex:VanGogh`.
 2IRI vanGogh = Values.iri("http://example.org/VanGogh");
 3
 4// By filtering on a specific subject we zoom in on the data that is about that subject.
 5// The filter method takes a subject, predicate, object (and optionally a named graph/context)
 6// argument. The more arguments we set to a value, the more specific the filter becomes.
 7Model aboutVanGogh = model.filter(vanGogh, null, null);
 8
 9// Iterate over the statements that are about Van Gogh
10for (Statement st : aboutVanGogh) {
11  // the subject will always be `ex:VanGogh`, an IRI, so we can safely cast it
12  IRI subject = (IRI) st.getSubject();
13  // the property predicate can be anything, but it's always an IRI
14  IRI predicate = st.getPredicate();
15
16  // the property value could be an IRI, a BNode, a Literal, or an RDF-star Triple. In RDF4J, Value is
17  // is the supertype of all possible kinds of RDF values.
18  Value object = st.getObject();
19
20  // let's print out the statement in a nice way. We ignore the namespaces and only print the
21  // local name of each IRI
22  System.out.print(subject.getLocalName() + " " + predicate.getLocalName() + " ");
23  if (object.isLiteral()) {
24    // it's a literal value. Let's print it out nicely, in quotes, and without any ugly
25    // datatype stuff
26    System.out.println("\"" + ((Literal) object).getLabel() + "\"");
27  } else if (object.isIRI()) {
28    // it's an IRI. Just print out the local part (without the namespace)
29    System.out.println(((IRI) object).getLocalName());
30  } else {
31    // it's a blank node or an RDF-star Triple. Just print it out as-is.
32    System.out.println(object);
33  }
34}
Example 10 shows how we can directly get all values of a property, for a given resource, from the model. To simply retrieve all paintings by van Gogh, we can do this:
1Set<Value> paintings = model.filter(vanGogh, EX.CREATOR_OF, null).objects();
Once we have selected the values, we can iterate and do something with them. For example, we could try and retrieve further information about each value, like so:
 1for (Value painting: paintings) {
 2  if (painting instanceof Resource) {
 3    // our value is either an IRI or a blank node. Retrieve its properties and print.
 4    Model paintingProperties = model.filter((Resource)painting, null, null);
 5
 6    // write the info about this painting to the console in Turtle format
 7    System.out.println("--- information about painting: " + painting);
 8    Rio.write(paintingProperties, System.out, RDFFormat.TURTLE);
 9    System.out.println();
10  }
11}
The Model.filter method does not actually return a new Model object: it returns a filtered view of the original Model. This means that invoking filter is very cheap, because it doesn’t have to copy the contents into a new Collection. It also means that any modifications to the original Model object will show up in the filter result, and vice versa.
Example 11 shows how we can directly get a single value of a property, from the model. In this example, we retrieve the first name of each known artist, and print it to the console:
 1// iterate over all resources that are of type 'ex:Artist'
 2for (Resource artist : model.filter(null, RDF.TYPE, EX.ARTIST).subjects()) {
 3  // get all RDF triples that denote values for the `foaf:firstName` property
 4  // of the current artist
 5  Model firstNameTriples = model.filter(artist, FOAF.FIRST_NAME, null);
 6
 7  // Get the actual first name by just selecting any property value. If no value
 8  // can be found, set the first name to '(unknown)'.
 9  String firstName = Models.objectString(firstNameTriples).orElse("(unknown)");
10
11  System.out.println(artist + " has first name '" + firstName + "'");
12}
In this code example, we use two steps to retrieve the first name for each artist. The first step, on line 5, is that we use Model.filter again. This zooms in to select only the foaf:firstName statements about the current artist (notice that I say statements, plural: there could very well be an artist with more than one first name).
For the second step, the actual selection of a single property value, we use the Models
utility. This class provides several useful shortcuts for working with data in a model. In this example, we are using the objectString method. What this method does is retrieve an arbitrary object-value from the supplied model, and return it converted to a String. Since the model we supply only contains foaf:firstName statements about the current artist, we know that the object we get back will be a first name of the current artist.
NOTE: The Models utility methods for selecting single values, such as Models.objectString, return any one arbitrary suitable value: if there is more than one possible object value in the supplied model, it just picks one. There is no guarantee that it will always pick the same value on consecutive calls.
As we have seen, the RDF data model can be viewed as a graph. Sometimes it is useful to group together sets of RDF data as separate graphs. For example, you may want to use several files together, but still keep track of which statements come from which file. An RDF4J Model
facilitates this by having an optional context parameter for most of it methods. This parameter allows you to identify a named graph in the Model, that is a subset of the complete model. In this section, we will look at some examples of this mechanism in action.
Example 12 shows how we can add information to separate named graphs in a single Model, and using that named graph information to retrieve those subsets again:
 1// We'll use a ModelBuilder to create two named graphs, one containing data about
 2// Picasso, the other about Van Gogh.
 3ModelBuilder builder = new ModelBuilder();
 4builder.setNamespace("ex", "http://example.org/");
 5
 6// In named graph 1, we add info about Picasso
 7builder.namedGraph("ex:namedGraph1")
 8    .subject("ex:Picasso")
 9      .add(RDF.TYPE, EX.ARTIST)
10      .add(FOAF.FIRST_NAME, "Pablo");
11
12// In named graph 2, we add info about Van Gogh.
13builder.namedGraph("ex:namedGraph2")
14  .subject("ex:VanGogh")
15    .add(RDF.TYPE, EX.ARTIST)
16    .add(FOAF.FIRST_NAME, "Vincent");
17
18
19// We're done building, create our Model
20Model model = builder.build();
21
22// Each named graph is stored as a separate context in our Model
23for (Resource context: model.contexts()) {
24  System.out.println("Named graph " + context + " contains: ");
25
26  // write _only_ the statemements in the current named graph to the console,
27  // in N-Triples format
28  Rio.write(model.filter(null, null, null, context), System.out, RDFFormat.NTRIPLES);
29  System.out.println();
30}
On line 7 (and 13, respectively), you can see how ModelBuilder
can add statements to a specific named graph using the namedGraph method. Similarly to how the subject method defines what subject each added statement is about (until we set a new subject), namedGraph defines what named graph (or ‘context’) each statement is added to, until either a new named graph is set, or the state is reset using the defaultGraph method.
On lines 23 and further, you can see two examples of how this information can be accessed from the resulting Model. You can explicitly retrieve all available contexts (line 23). You can also use a context identifier as a parameter for the filter method, as shown on line 28.
When RDF models grow larger and more complex, simply keeping all the data in an in-memory collection is no longer an option: large amounts of data will simply not fit, and querying the data will require more sophisticated indexing mechanisms. Moreover, data consistency ensurance mechanisms (transactions, etc) will be necessary. In short: you need a database.
RDF4J has a standardized access API for RDF databases, called the Repository API. This API provides all the things we need from a database: a sophisticated transaction handling mechanism, controls to work efficiently with high data volumes, and, perhaps most importantly: support for querying your data using the SPARQL query language.
In this part of the tutorial, we will show the basics of how to use the Repository API and execute some simple SPARQL queries over your RDF data. Explaining SPARQL or the Repository API in detail is out of scope, however. For more details on how to use the Repository API, have a look at Programming with RDF4J.
Example 13 shows how we can add our RDF Model to a database:
 1// First load our RDF file as a Model.
 2String filename = "example-data-artists.ttl";
 3InputStream input = Example11AddRDFToDatabase.class.getResourceAsStream("/" + filename);
 4Model model = Rio.parse(input, "", RDFFormat.TURTLE);
 5
 6// Create a new Repository. Here, we choose a database implementation
 7// that simply stores everything in main memory.
 8Repository db = new SailRepository(new MemoryStore());
 9
10// Open a connection to the database
11try (RepositoryConnection conn = db.getConnection()) {
12  // add the model
13  conn.add(model);
14
15  // let's check that our data is actually in the database
16  try (RepositoryResult<Statement> result = conn.getStatements(null, null, null)) {
17    for (Statement st: result) {
18      System.out.println("db contains: " + st);
19    }
20  }
21}
22finally {
23  // before our program exits, make sure the database is properly shut down.
24  db.shutDown();
25}
In this code example (line 8), we simply create a new Repository
on the fly. We use a SailRepository
as the implementing class of the Repository interface, which takes a database implementation (known in RDF4J as a SAIL - “Storage and Inferencing Layer”) as its constructor. In this case, we use a simple in-memory database implementation.
Once we have created and initialized our database, we open a RepositoryConnection
to it (line 11). This connection is an AutoCloseable resource that offers all sorts of methods for executing commands on the database: adding and removing data, querying, starting transactions, and so on.
In the code example in the previous section, we first loaded an RDF file into a Model object, and then we added that Model object to our database. This works fine for smaller files, but as data gets larger, you really don’t want to have to load it completely in main memory before storing it in your database.
Example 14 shows how we can add our RDF data to a database directly, without first creating a Model:
 1// Create a new Repository.
 2Repository db = new SailRepository(new MemoryStore());
 3
 4// Open a connection to the database
 5try (RepositoryConnection conn = db.getConnection()) {
 6  String filename = "example-data-artists.ttl";
 7  try (InputStream input = Example14AddRDFToDatabase.class.getResourceAsStream("/" + filename)) {
 8    // add the RDF data from the inputstream directly to our database
 9    conn.add(input, "", RDFFormat.TURTLE);
10  }
11
12  // let's check that our data is actually in the database
13  try (RepositoryResult<Statement> result = conn.getStatements(null, null, null)) {
14    for (Statement st : result) {
15      System.out.println("db contains: " + st);
16    }
17  }
18} finally {
19  // before our program exits, make sure the database is properly shut down.
20  db.shutDown();
21}
The main difference with the previous example is on lines 7-11: we still open an InputStream to access our RDF file, but we now provide that stream directly to the Repository, which then takes care of reading the file and adding the data without the need to keep the fully processed model in main memory.
Example 15 shows how, once we have added data to our database, we can execute a simple SPARQL SELECT-query:
 1// Create a new Repository.
 2Repository db = new SailRepository(new MemoryStore());
 3
 4// Open a connection to the database
 5try (RepositoryConnection conn = db.getConnection()) {
 6  String filename = "example-data-artists.ttl";
 7  try (InputStream input = Example15SimpleSPARQLQuery.class.getResourceAsStream("/" + filename)) {
 8    // add the RDF data from the inputstream directly to our database
 9    conn.add(input, "", RDFFormat.TURTLE);
10  }
11
12  // We do a simple SPARQL SELECT-query that retrieves all resources of type `ex:Artist`,
13  // and their first names.
14  String queryString = "PREFIX ex: <http://example.org/> \n";
15  queryString += "PREFIX foaf: <" + FOAF.NAMESPACE + "> \n";
16  queryString += "SELECT ?s ?n \n";
17  queryString += "WHERE { \n";
18  queryString += "    ?s a ex:Artist; \n";
19  queryString += "       foaf:firstName ?n .";
20  queryString += "}";
21
22  TupleQuery query = conn.prepareTupleQuery(queryString);
23
24  // A QueryResult is also an AutoCloseable resource, so make sure it gets closed when done.
25  try (TupleQueryResult result = query.evaluate()) {
26    // we just iterate over all solutions in the result...
27    for (BindingSet solution : result) {
28      // ... and print out the value of the variable binding for ?s and ?n
29      System.out.println("?s = " + solution.getValue("s"));
30      System.out.println("?n = " + solution.getValue("n"));
31    }
32  }
33} finally {
34  // Before our program exits, make sure the database is properly shut down.
35  db.shutDown();
36}
On lines 15-21, we define our SPARQL query string, and on line 22 we turn this into a prepared Query
object. We are using a SPARQL SELECT-query, which will return a result consisting of tuples of variable-bindings (each tuple containing a binding for each variable in the SELECT-clause). Hence, RDF4J calls the constructed query a TupleQuery
, and the result of the query a TupleQueryResult
. Lines 26-34 is where the actual work gets done: on line 25, the query is evaluated, returning a result object. RDF4J QueryResult objects execute lazily: the actual data is not retrieved from the database until we start iterating over the result (as we do on lines 27-33). On line 27 we grab the next solution from the result, which is a BindingSet
. You can think about a BindingSet as being similar to a row in a table (the binding names are the columns, the binding values the value for each column in this particular row). We then grab the value of the binding of variable ?s (line 30) and ?n (line 31) and print them out.
There are a number of variations possible on how you execute a query and process the result. We’ll show some of these variations here, and we recommend that you try them out by modifying code example 13 in your own editor and executing the modified code, to see what happens.
One variation is that we can materialize the TupleQueryResult iterator into a simple java List, containing the entire query result:
1List<BindingSet> result = QueryResults.asList(query.evaluate());
2for (BindingSet solution: result) {
3     System.out.println("?s = " + solution.getValue("s"));
4     System.out.println("?n = " + solution.getValue("n"));
5}
On line 1, we turn the result of the query into a List using the QueryResults
utility. This utility reads the result completely and also takes care of closing the result (even in case of errors), so there is no need to use a try-with-resources clause in this variation.
Another variation is that instead of retrieving the query result as an iterator object, we let the query send its result directly to a TupleQueryResultHandler
. This is a useful way to directly stream a query result to a file on disk. Here, we show how to use this mechanism to write the result to the console in tab-separated-values (TSV) format:
1TupleQueryResultHandler tsvWriter = new SPARQLResultsTSVWriter(System.out);
2query.evaluate(tsvWriter);
Another type of SPARQL query is the CONSTRUCT-query: instead of returning the result as a sequence of variable bindings, CONSTRUCT-queries return RDF statements. CONSTRUCT queries are very useful for quickly retrieving data subsets from an RDF database, and for transforming that data.
Example 16 shows how we can execute a SPARQL CONSTRUCT query in RDF4J. As you can see, most of the code is quite similar to previous examples:
 1// Create a new Repository.
 2Repository db = new SailRepository(new MemoryStore());
 3
 4// Open a connection to the database
 5try (RepositoryConnection conn = db.getConnection()) {
 6    String filename = "example-data-artists.ttl";
 7    try (InputStream input =
 8      Example14SPARQLConstructQuery.class.getResourceAsStream("/" + filename)) {
 9      // add the RDF data from the inputstream directly to our database
10      conn.add(input, "", RDFFormat.TURTLE );
11    }
12
13    // We do a simple SPARQL CONSTRUCT-query that retrieves all statements
14    // about artists, and their first names.
15    String queryString = "PREFIX ex: <http://example.org/> \n";
16    queryString += "PREFIX foaf: <" + FOAF.NAMESPACE + "> \n";
17    queryString += "CONSTRUCT \n";
18    queryString += "WHERE { \n";
19    queryString += "    ?s a ex:Artist; \n";
20    queryString += "       foaf:firstName ?n .";
21    queryString += "}";
22
23    GraphQuery query = conn.prepareGraphQuery(queryString);
24
25    // A QueryResult is also an AutoCloseable resource, so make sure it gets
26    // closed when done.
27    try (GraphQueryResult result = query.evaluate()) {
28  // we just iterate over all solutions in the result...
29  for (Statement st: result) {
30      // ... and print them out
31      System.out.println(st);
32  }
33    }
34}
35finally {
36    // Before our program exits, make sure the database is properly shut down.
37    db.shutDown();
38}
On lines 15-21 we create our SPARQL CONSTRUCT-query. The only real difference is line 17, where we use a CONSTRUCT-clause (instead of the SELECT-clause we saw previously). Line 23 turns the query string into a prepared Query object. Since the result of a CONSTRUCT-query is a set of RDF statements (in other words: a graph), RDF4J calls such a query a GraphQuery
, and its result a GraphQueryResult
.
On line 27 and further we execute the query and iterate over the result. The main difference with previous examples is that this time, the individual solutions in the result are Statements
.
As with SELECT-queries, there are a number of variations on how you execute a CONSTRUCT-query and process the result. We’ll show some of these variations here, and we recommend that you try them out by modifying code example 14 in your own editor and executing the modified code, to see what happens.
One variation is that we can turn the GraphQueryResult iterator into a Model, containing the entire query result:
1Model result = QueryResults.asModel(query.evaluate());
2for (Statement st: result) {
3     System.out.println(st);
4}
In this particular example, we then iterate over this model to print out the Statements, but obviously we can access the information in this Model in the same ways we have already seen in previous sections.
Another variation is that instead of retrieving the query result as an iterator object, we let the query send its result directly to a RDFHandler
. This is a useful way to directly stream a query result to a file on disk. Here, we show how to use this mechanism to write the result to the console in Turtle format
1RDFHandler turtleWriter = Rio.createWriter(RDFFormat.TURTLE, System.out);
2query.evaluate(turtleWriter);
You should now have a basic understanding of the RDF data model, and have a decent grasp on how you can use RDF4J to read, write, create, store, and query RDF data. For more information on how to use RDF4J, we recommend the following sources:
util packages scattered throughout the API, these often contain very useful helper classes and utilities.For more detailed information about RDF, and SPARQL, consult the following sources:
The W3C RDF 1.1 Primer introduces the basic concepts of RDF and shows concrete examples of the use of RDF.
The W3C SPARQL 1.1 Query Language Recommendation is the normative specification of the SPARQL Query Language. It contains a complete overview of all SPARQL operators and capabilities, including many useful examples.
The W3C SPARQL 1.1 Update Recommendation is the normative specification for SPARQL Update operations. SPARQL Update allows you to insert, modify, delete, copy and move RDF data.
If you require any further help, you can contact us to get support. We welcome your feedback.
Table of Contents